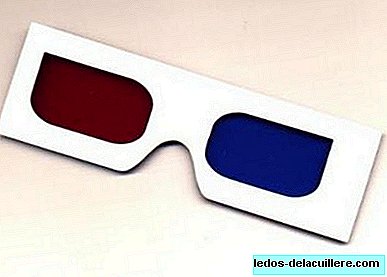
Yesterday we brought you the 3D anaglyphs of pregnancy and today, for all those who do not have them, I bring you a simple guide for build our own 3D glasses at home.
To do this, simply download the template and get down to work. The necessary material is as follows:
- Cardboard (with paper will be little resistant).
- Scissors.
- Blue and red cellophane paper.
- Zeal or glue.
- Template (which you can download here).
Let's see the steps we must follow:
- Access the template. An explorer window will open with the image. By right clicking on the mouse on it we can reach the order "Print image ..." to print it on the card.
- We cut the glasses, the pins and the red and blue rectangles, which are where the colored cellophane pieces should go.
- We cut red cellophane (a little larger than the hole it is intended for) and paste it with jealousy or glue in the area where the red color was printed and which will go to the left eye.
- We cut blue cellophane and glue it in the same way in the area where the color was blue. By discarding the blue goes to the right eye.
- Then we cut the pins and glue them to the glasses.
With this we will have our own anaglyph glasses to view 3D images.
The theory says that each color acts as a filter showing only the image with the stereo pair. In other words, with the red color we should see the blue part and with the blue one see only the red part since the filter only allows us to see the image that is not the same color.
The experience today with my homemade glasses is regular. The blue color performs its effect perfectly, but the red color allows me to see both colors (when it shouldn't).
The red cellophane should preferably be somewhat dark and in my case it is somewhat light. If it happens to you like me, you can try to fix it putting two sheets Cellophane
How much I miss now all those 3D glasses that have given me for the cinema or shows and that have ended up in the trash.